Got hold of a second-hand Sony Xperia E3 a couple of weeks ago and was surprised by its general build quality and IPS screen for a 2014 phone.
Of course it was loaded with crapware and bloatware both from the ISP and manufacturer. Time to get my hands dirty back in the Android ecosystem, and try to clean that up.
This process started with the following devices:
-
Sony Xperia E3 with stock firmware and OS:
-
Model number:
D2203(LTE variant) -
Android version:
4.4.2(KitKat) -
Baseband version:
8926-DAAAANAZQ-00282-04(Europe, France, Orange) -
Kernel version:
3.4.0 -
Build number:
18.4.C.1.29
-
-
MacBook Air (macOS 10.14 Mojave)
Factory Reset 
First things first, let’s clean up that phone using the standard functions:
-
Connect to local wifi.
-
Update phone’s stock firmware, OS and apps using Sony’s Update Center .
-
Format the attached SD card if any to destroy previous user’s personal data.
-
Factory reset the phone.
Unlock Bootloader 
Phone was locked, tied to an Orange contract. Sony is providing everything online to properly unlock the phone, and the warranty has been expired for a long time. So let’s proceed!
-
Enter service mode by dialing
*#*#7378423#*#*on the phone. -
Go to
Service info>Configuration>Rooting Status. -
There, the presence of the
      Bootloader


      unlock


      allowed:


      Yes
status confirm the phone is currently locked, but allowed to be unlocked. -
Dial
*#06#on the phone to get its IMEI unique ID. Note that number somewhere. -
Follow the procedure on that site, and enter your phone’s IMEI to get an unlock key. Write it down.
There are several ways to feed that key to the phone. Here is how I did it under macOS:
-
We need to activate the developer mode. On the phone, go to phone’s
Settingsapp >About phone. At the bottom, click 7 times on theBuild numberline. Developer mode has been unlocked once you get theYou are now a developernotification. -
Then you can enable it for good in the
Settings>System>Developer optionsmenu. There, check theDeveloper optiontoggle button is set toON. -
We’re now going to activate USB access with CLI tools . Scroll down in the menu to find the
Debuggingitem, and enable theUSB debuggingoption. -
On a macOS terminal, install Homebrew :
$ /usr/bin/ruby -e "$(curl -fsSL https://raw.githubusercontent.com/Homebrew/install/master/install)"
-
Now install Android tools with Homebrew from the terminal:
$ brew install android-platform-tools
-
Plug the phone to your computer with a micro USB cable.
-
Check your device is recognized by
adb:$ adb devices List of devices attached BL4828DXXXXX device
-
Reboot device in bootloader mode:
$ adb reboot bootloader
-
Unlock the device with the unlock key previously fetched from Sony:
$ fastboot oem unlock 0x0828XXXXXXXXXXXX
-
Reboot the device in standard mode:
$ fastboot reboot
-
Go back to service mode (dial
*#*#7378423#*#*; go toService info>Configuration>Rooting Status) and confirm theBootloader unlock : Yesstatus. If so, your phone is now unlocked!
All the steps above have been performed with the stock ecosystem: firmware, ROM and OS are all standard. Now we’ll delves into the dark side.
Root Phone 
We’ll now root the phone.
-
Get a microSD card and insert it in the phone.
-
Format the external SD card from the phone. Unmount it, then physically remove it from the phone.
-
Plug that card to your computer.
-
Download King Root for Android (v5.3.7 in my case). Copy the
.apkfile to the SD card. -
Unmount and remove the card from the computer. Insert it back into the phone, and mount it.
-
In
Settings>Securitymenu, allow applications to be installed from unknown sources. -
Connect to wifi, go to Google Play store and install a file browser. My personal favorite: Amaze File Manager .
-
Use the file manager to browse into the SD card, find the APK, install it and run KingRoot .
Flash Custom Recovery 
The custom ROM I’ll provide here only targets Sony Xperia E3 D2203 LTE model with the stock 4.4.2 Android.
Before proceeding any further, please double check your device is the right one, with the expected versions. If not you’re at risk of bricking your device for good.
-
It was hard to find an appropriate ROM so here is a copy of the
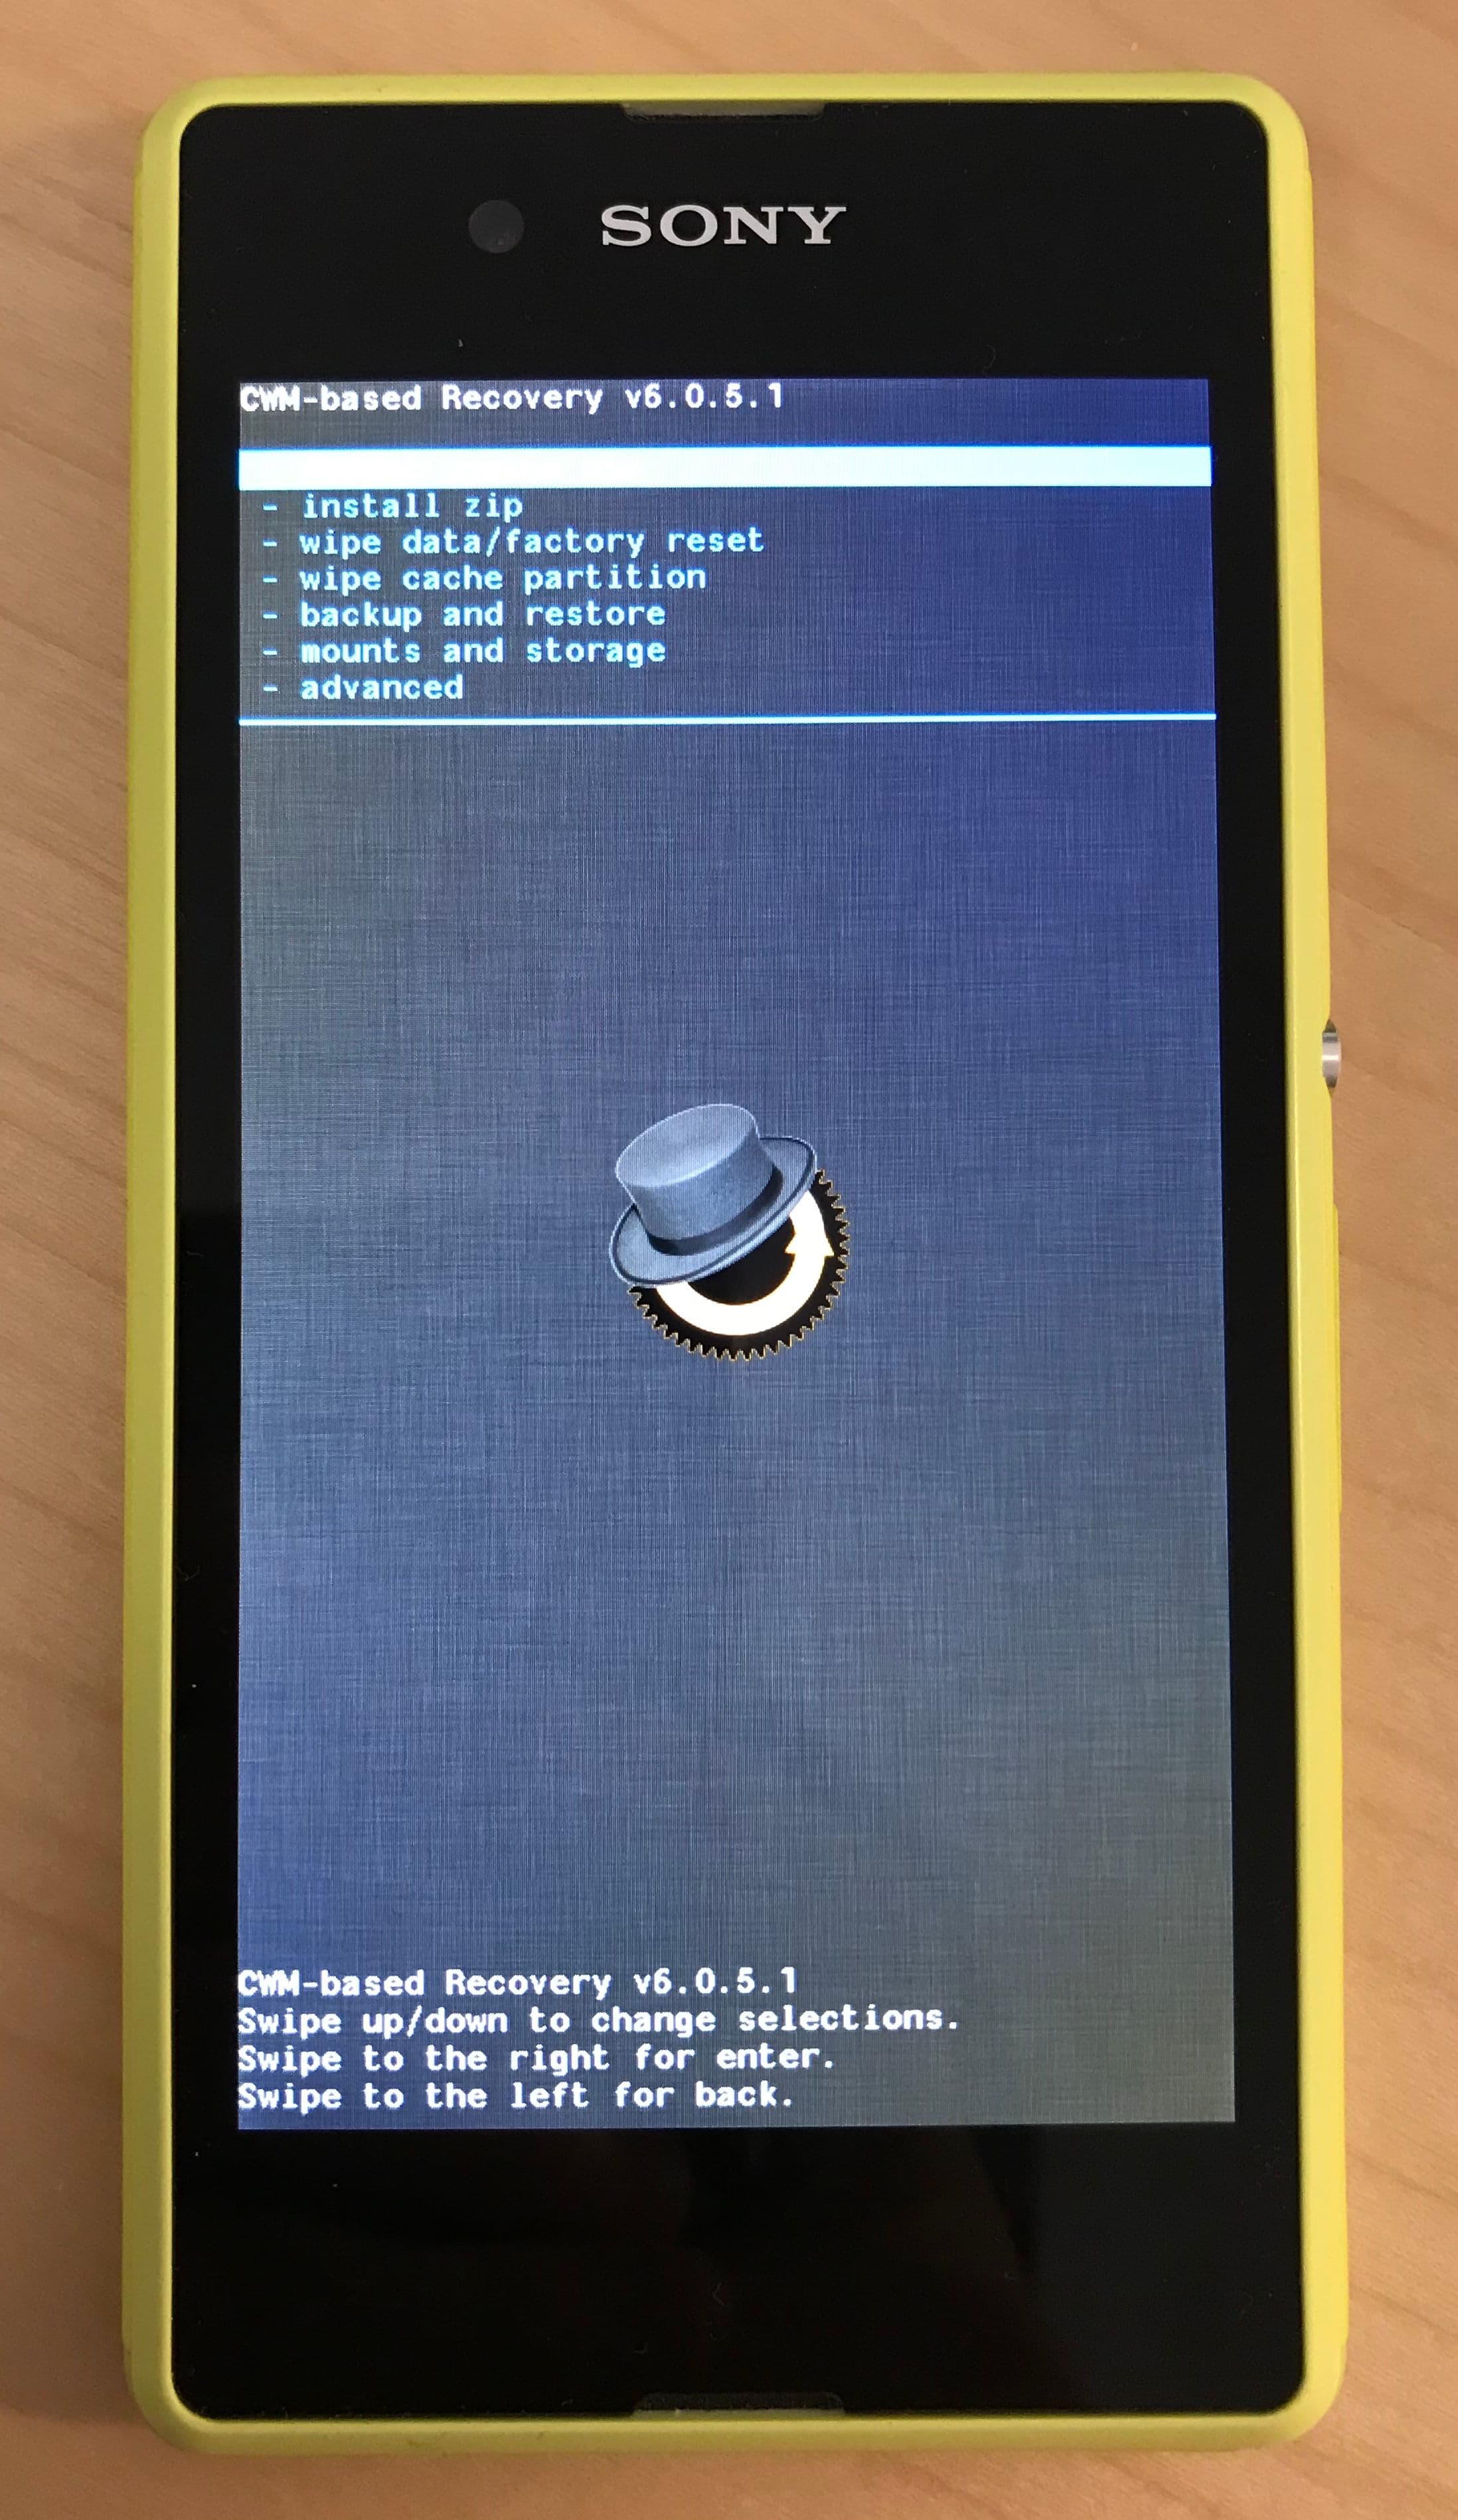
boot_D2203_4.4.2.imgfile . I originally found it on an article on How to Install Custom Recovery on Sony Xperia E3 , and the image itself is hosted on MediaFire .It is a CMW-based Recovery v6.0.4.7 uniquely built for the D2203 LTE model.
Download it and compare its checksum:
$ wget -P ~/Downloads/ http://download1582.mediafire.com/d8vmcjzc4xfg/627epe7817tolaf/boot_D2203_4.4.2.img (...) $ sha1sum ~/Downloads/boot_D2203_4.4.2.img 7fdf48efa91167ee20282b6595e11fe5afef72f2 boot_D2203_4.4.2.img
-
Make sure the phone is plugged into your computer, and reboot the device in bootloader mode:
$ adb devices List of devices attached BL4828DXXXXX device $ adb reboot bootloader
-
Flash the custom ROM:
$ fastboot flash boot ~/Downloads/boot_D2203_4.4.2.img
Here you might stumble upon the following error:
Writing 'recovery' FAILED (remote: 'partition table doesn't exist')If that the case it’s because you tried to flash the ROM into the recovery partition (as generally advised in most tutorials out there), with a command similar to:
$ fastboot flash recovery boot.img
This doesn’t cut it: as foxite explained in 2016 , the custom ROM provided here targets the boot partition.
-
Reboot the device:
$ fastboot reboot
The boot process should be eventless, as if nothing happened.
-
Now if you reboot your device once more, you’ll notice a slight difference.
When the Sony Xperia logo show up, at the very start of the boot process, the front notification LED gets turned on in pink for a couple of seconds while the phone briefly vibrate.
And right at that time you press alternatively the ++up++ and ++down++ volume buttons a couple of times, while the LED last, you’ll boot into the custom recovery ROM you just flashed:
Custom OS 
In this section we will install a new OS to refresh the dated one.
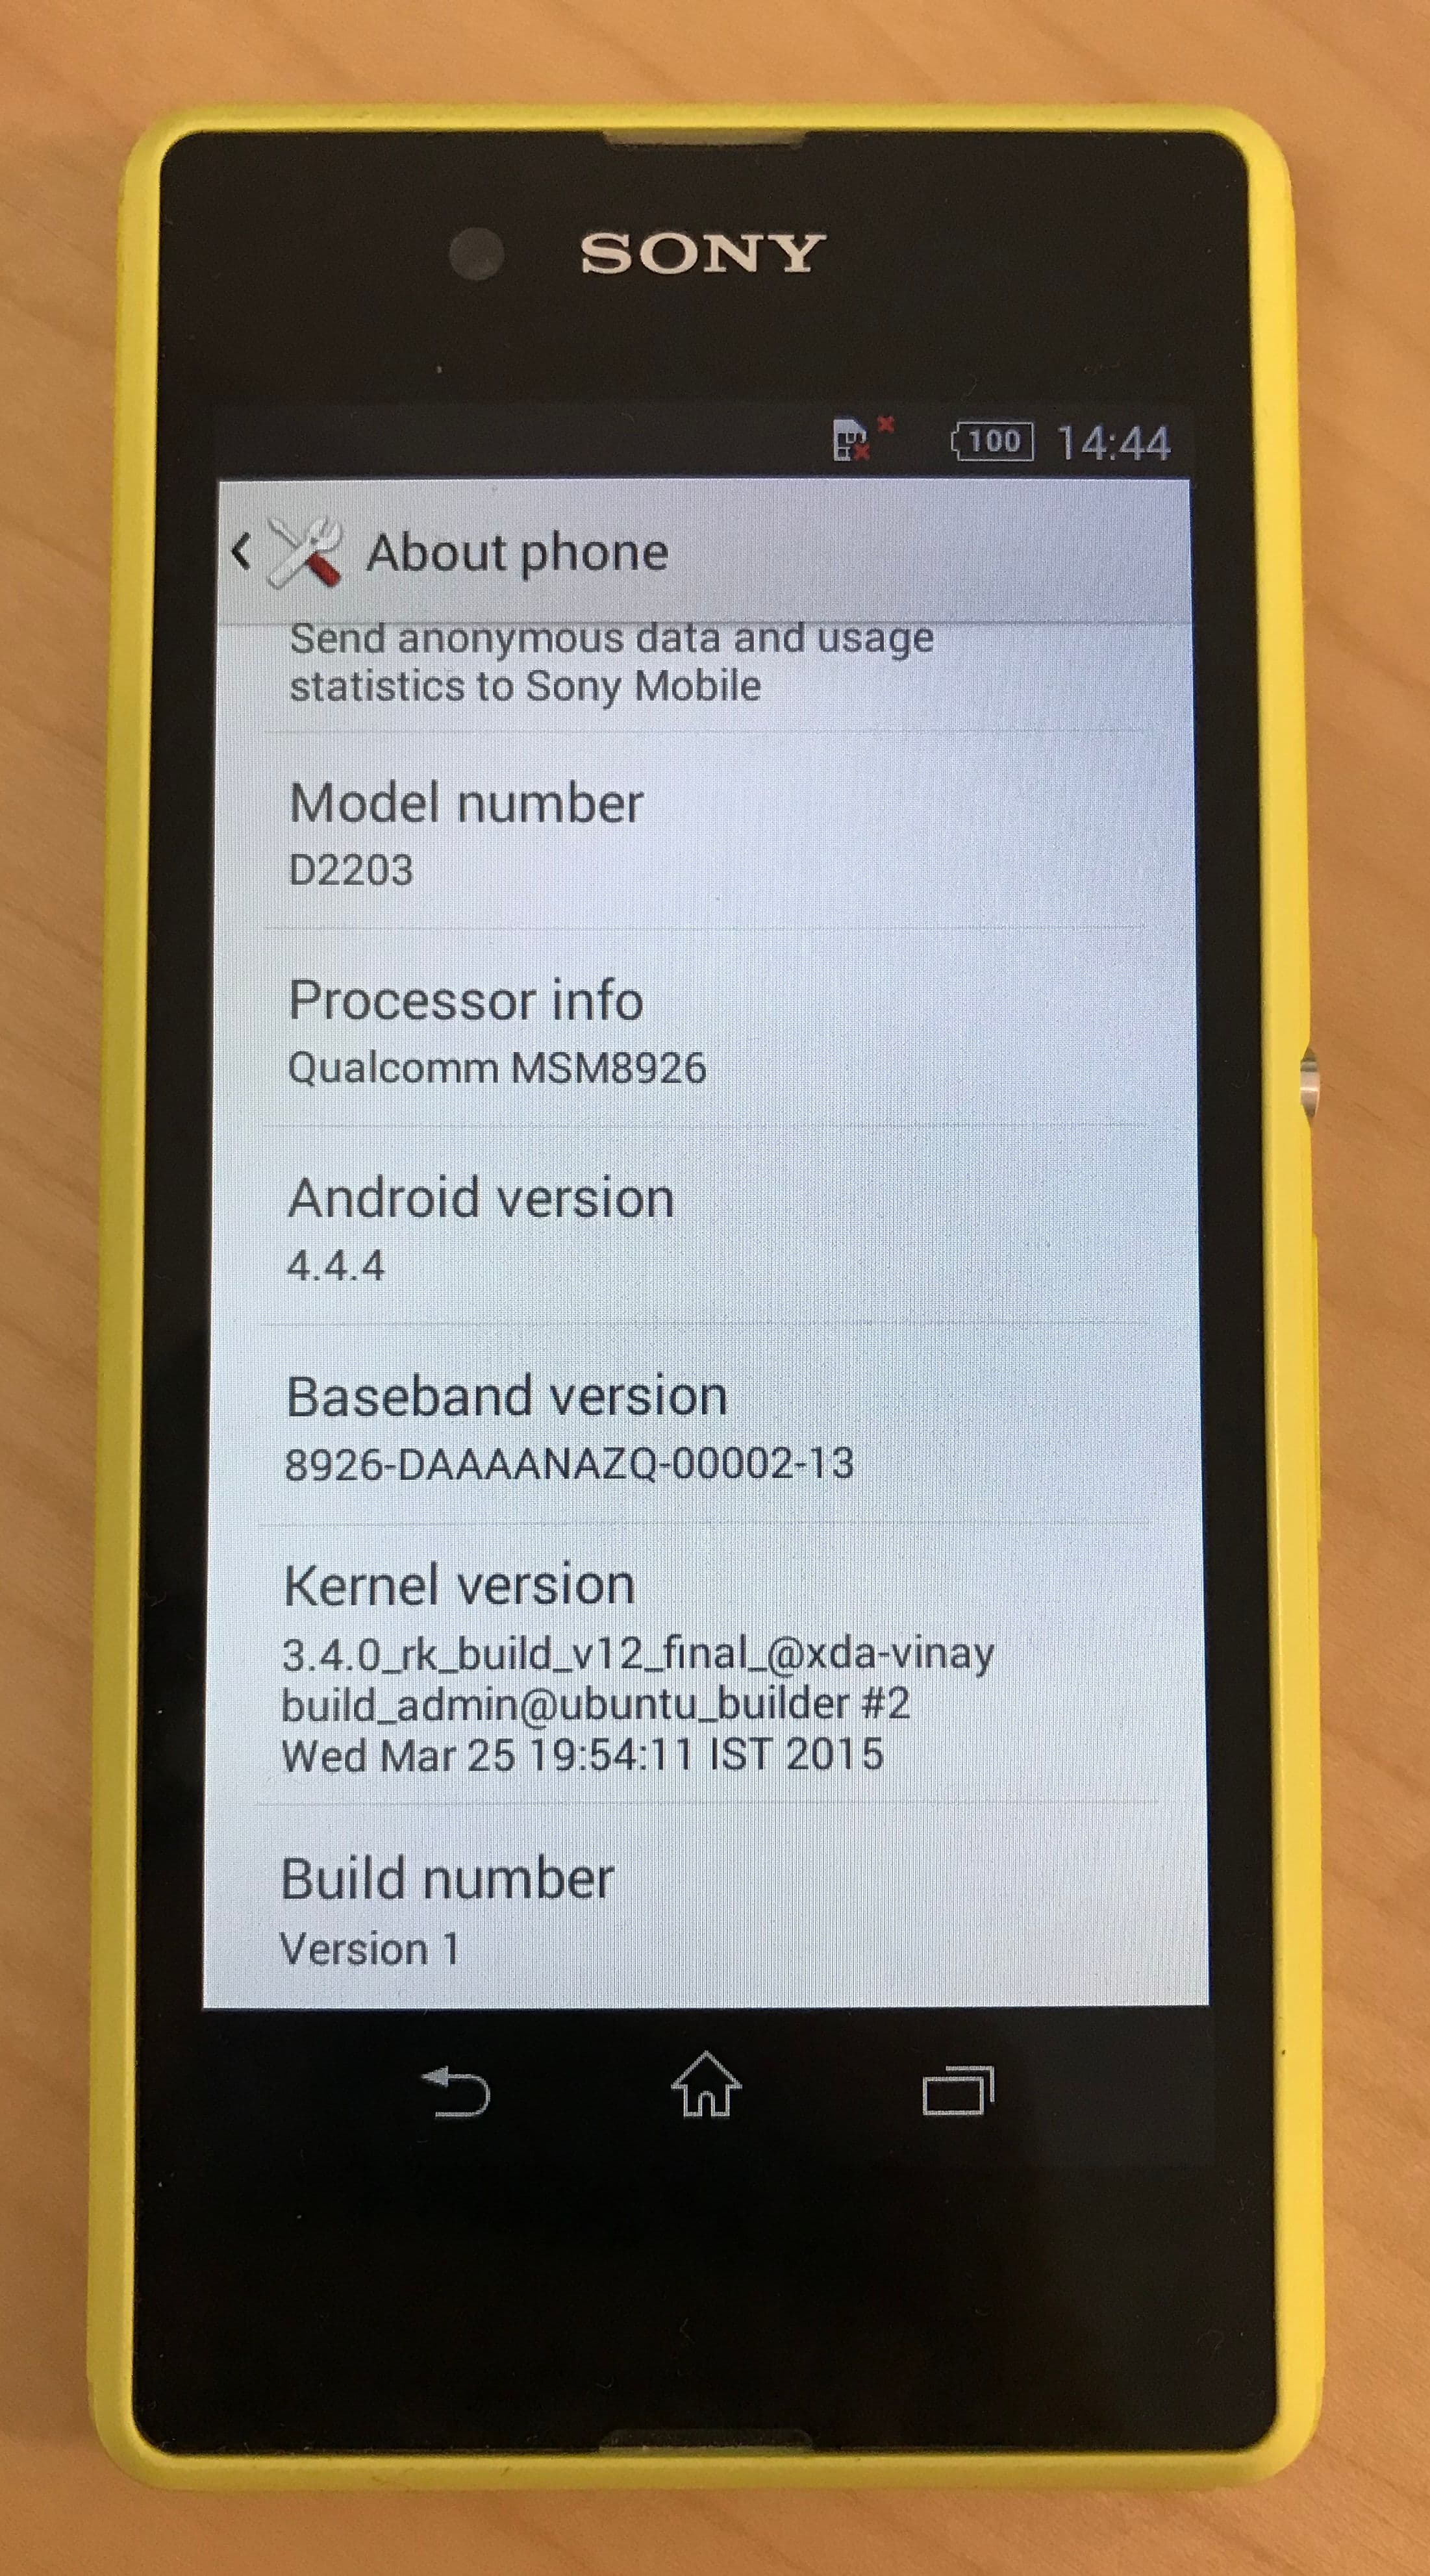
I choose a tweaked yet stable distribution based on the stock Android 4.4.4 and 18.5.C.0.19 firmware. The main reason being that more experimental ports of Android 5.0 exists but often lacks support for the camera.
-
Download the so called De-bloated, Tweaked, Pre-Rooted, ROM for the Sony Xperia E3 from XDA forums . The original ROM being long gone, a copy is available online (SHA1 checksum:
d2e949d15aea97c64414ae2ef493f7b18e32dd78). -
Unzip that file. You should end up with that structure:
[  96]  clockworkmod
└── [ 128]  backup
    └── [ 352]  Version_1
        ├── [ 20M]  boot.img
        ├── [   0]  cache.ext4.tar
        ├── [1.1M]  cache.ext4.tar.a
        ├── [   0]  data.ext4.tar
        ├── [2.5K]  data.ext4.tar.a
        ├── [ 343]  nandroid.md5
        ├── [232K]  recovery.log
        ├── [   0]  system.ext4.tar
        └── [871M]  system.ext4.tar.a
-
Copy the
clockworkmodfolder and its content at the root of the SD card. Unmount the card and place it into the phone. -
Reboot the phone and enter the recovery ROM.
-
Go to
wipe data/factory reset>Yes - Wipe all user datato clean up cache. -
Repeat same thing but this time go to
wipe cache partition>Yes - Wipe Cache. -
Again, go to
advanced>wipe dalvik cache>Yes - Wipe Dalvik Cache. -
Go back to the main recovery menu, then mount the SD card:
mounts and storage>mount /storage/sdcard1. -
Then go back,
backup and restore>restore from /storage/sdcard1>Version_1(i.e. the name of the first subfolder from the ZIP file we downloaded above) >Yes - Restore. -
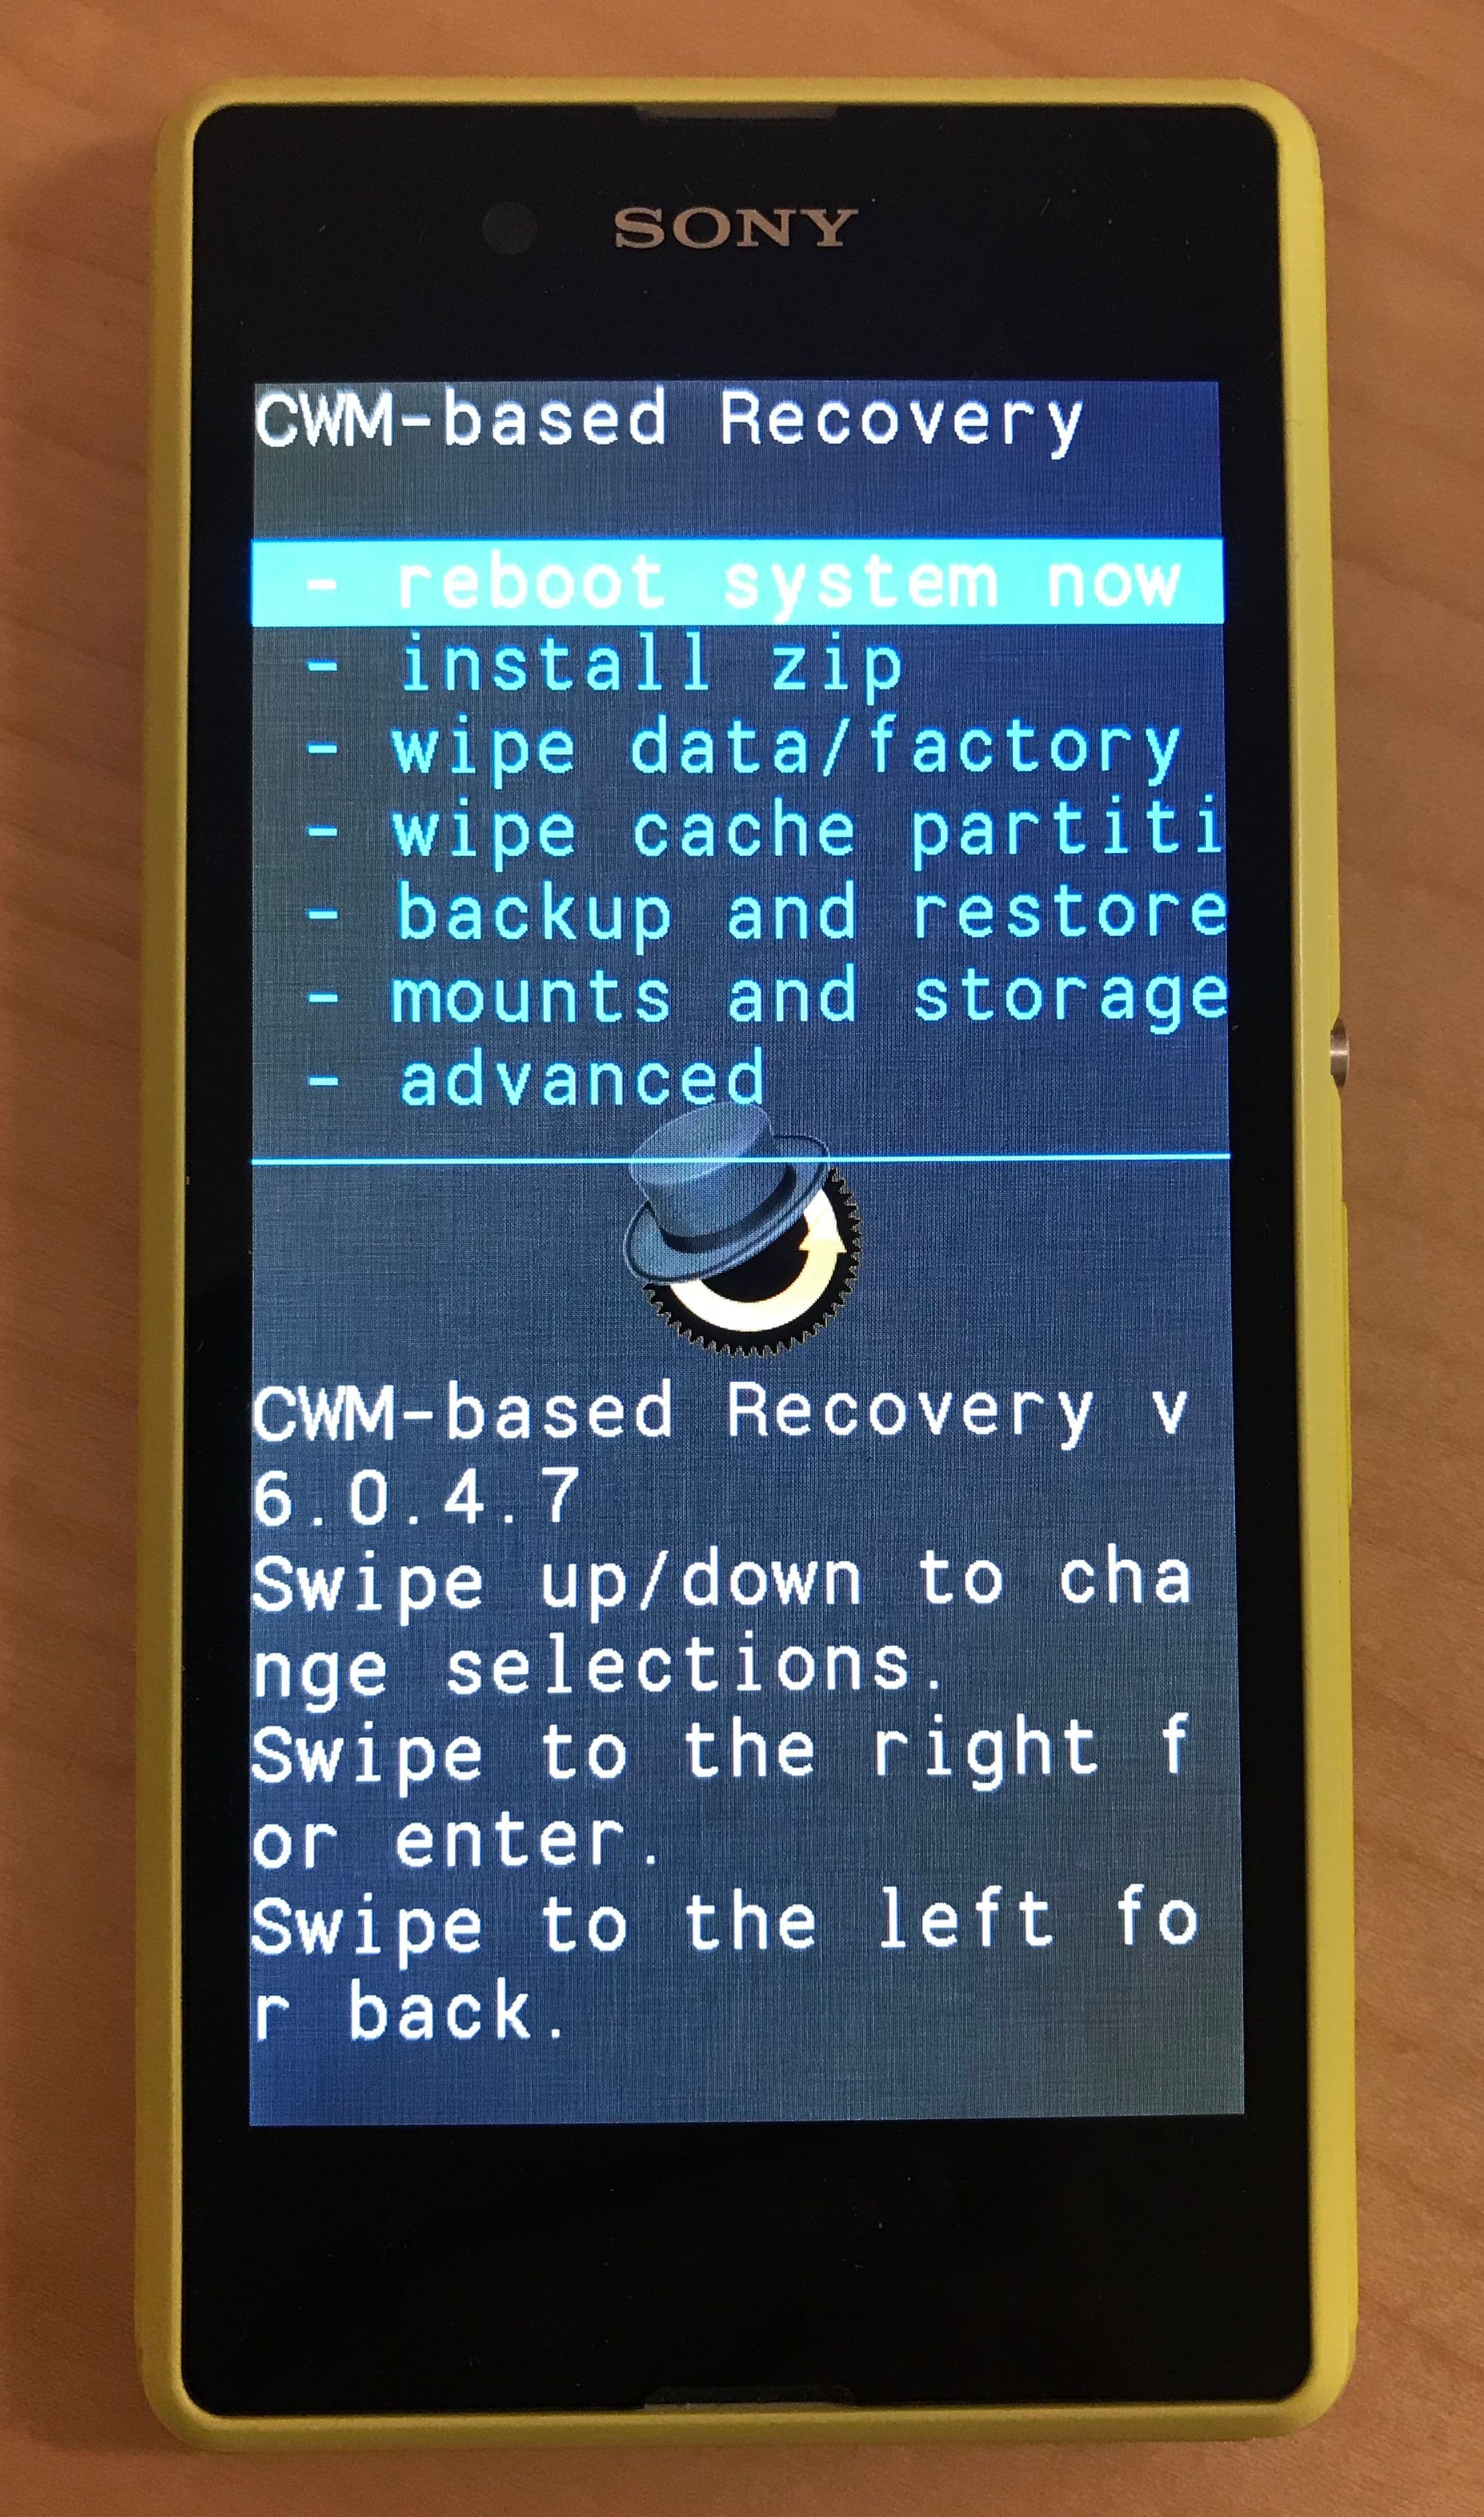
Wait while the installation is performed. At the end you can reboot the device and you should have a brand new and clean phone:
Epilogue 
I wrote this article along the way, as I was (re)discovering the whole Android development scene. Brings back memories. But I’m a little rusty which explain the somewhat convoluted process.
At the end, I realized there’s no need to go through the extra hoops of rooting the phone and copying APKs on SD card when you can simply download and execute them from the phone’s browser.
Another huge detour I took was the hunt for a custom CMW recovery image. I could have instead unzip the
Version_1_RegisUpload.zip
file and flash the
clockworkmod/backup/Version_1/boot.img
image right away, instead of
boot_D2203_4.4.2.img
. The benefit being a slightly newer version (6.0.5.1), the LED being turned on in white instead of pink, and an appropriate screen size: