
Qemu images can’t be growed. In this example I will show you a little hack to grow a 6GiB
qcow
image to a 10GiB image. Beware: these operations can take a lot of time to perform and require lots of free space.
First, convert your
qcow
image to a plain raw file:
1$ qemu-img convert system.qcow -O raw system.raw
Then, create a dummy file (filled with zeros) of the size of extra space you want to add to your image. In this case, 4GiB (=10GiB - 6GiB):
1$ dd if=/dev/zero of=zeros.raw bs=1024k count=4096
Fearlessly, add your extra space to your raw system image:
1$ cat system.raw zeros.raw > big10G.raw
After that you can boot qemu to verify that added free space is available:
1$ qemu -hda big10G.raw
Here is an real case example of what you can see in a qemu image on which Windows XP was installed:
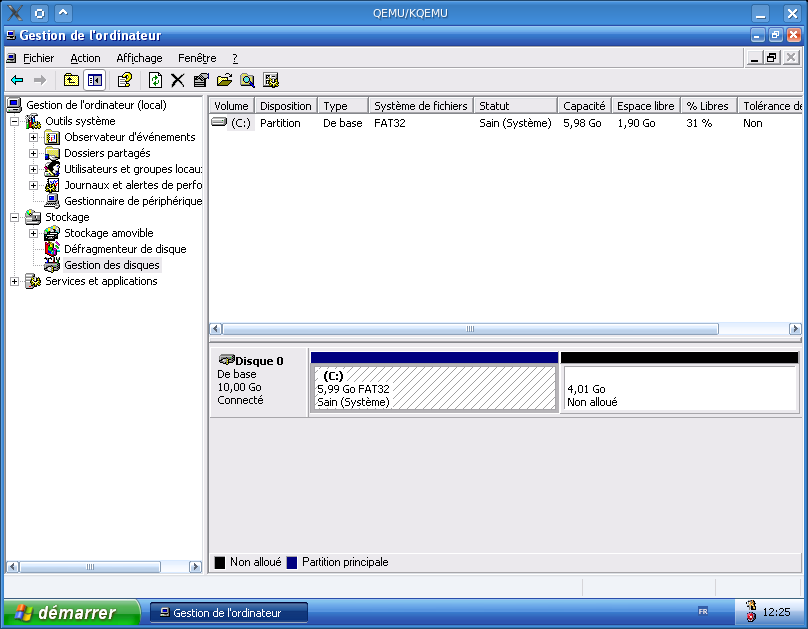
Now, to grow your primary partition, I suggest you to download a Live CD like
gparted Live CD
or
System Rescue CD
, and boot on the
.iso
file with qemu:
1$ qemu -hda big10G.raw -cdrom gparted-livecd-0.3.4-5.iso -boot d
This will allow you to grow and manipulate all your partitions safely thanks to parted and other open source system tools.
Finally you can convert back your
raw
image to a
qcow
one to not waste space:
1$ qemu-img convert big10G.raw -O qcow growed-system.qcow
That’s all!
By the way, I think it’s possible to perform the second and third step of this how-to in a single operation using
dd
only.
Update : I missed it, but this issue is also described in the FAQ from the unofficial #qemu wiki (look at “ How do I resize a disk image? ” question).
18 archived comments
Comments are closed. These were posted on Disqus, and are archived here.
-
Thanks for putting this up. I've tried this a few times but after I cat my raw files together it no longer boots:
$ qemu winXP_pro-test.img
- works fine
$ qemu-img convert winXP_pro-test.img -O raw system.raw
$ qemu system.raw
- came up to a safe mode prompt the first time, boots normally now.
$ qemu-img info system.raw
image: system.raw
file format: raw
virtual size: 2.0G (2097152000 bytes)
disk size: 1.0G
$ qemu-img info zeros.raw
image: zeros.raw
file format: raw
virtual size: 6.0G (6442450944 bytes)
disk size: 6.0G
$ cat system.raw zeros.raw > winXP_8G.raw
$ qemu-img info winXP_8G.raw
image: winXP_8G.raw
file format: raw
virtual size: 8.0G (8539602944 bytes)
disk size: 8.0G
$ qemu winXP_8G.raw
Bochs says:  A disk read error has occurred.
If I run an image image of
partedmagic-1.6it shows the partition correctly and lets me resize it - but resizing a non bootable image doesn't mean a whole lot. My guess is the problem has something to do with thevirtual size: 2.0G disk size: 1.0Gof my raw file. That's whatqemu-imggives me converting from cow format. XP shows the drive as being 2GB when I run the original image.-
I've never encounter your problem during my experiments, and I have no idea how to fix your problem. Sorry...
I didn't know the
qemu-img infocommand. I don't know if this can help you, but the onlyrawimage file I still have return me this:[kevin@localhost qemu]$ qemu-img info qemu-winXP.raw image: qemu-winXP.raw file format: raw virtual size: 10G (10737418240 bytes) disk size: 9.0G
As you can see, like you, I have the same 1G offset...
-
For details on "A disk read error has occurred." please check this post: http://qemu-forum.ipi.fi/viewtopic.php?p=12362
The complete procedure would now be
1- Convert to a raw image
qemu-img convert system.qcow -O raw system.raw
2- Increase the size of the raw image
dd if=/dev/zero of=system.raw seek=N obs=1GB count=0
where
Nis the number of GigaBytes3- Fix the NTFS BPB
Edit the raw file:hexedit system.raw
Goto to offset 7E00:7E00
Change 80 to FF at offset 7E1A and save:FF --> Ctrl-x --> y4- Boot Windows and check that you see a bigger disk in the admin tools
qemu hda system.raw
5- Use (fantastic) gparted to resize your NTFS partition
qemu -hda system.raw -cdrom gparted-livecd-0.3.4-5.iso -boot d
6- Boot windows to check and perform a
chkdskqemu hda system.raw
7- If you need to save space, convert back to qcow
qemu-img convert system.raw -O qcow growed-system.qcow
-
-
If you have the image in a raw file and the host filesystem is supporting files with holes a simpler, quicker and less space-wasting way to increase your virtual disk size is:
dd if=/dev/zero of=system.raw bs=1 count=1 seek=10G
In this way
ddleaves a hole of 10G from the beginning of the file (leaving everything untouched) and then writes a 0.-
There's a better way to do the data append than by creating huge files and cat'ing them together...try this to use sparse files and save a bunch of space:
dd if=/dev/zero of=system.raw bs=1 count=1 seek=$(( - 1 )) conv=notrunc
-
Regarding combining the
ddand thecatinto one statement, you can changedd if=/dev/zero of=zeros.raw bs=1024k count=4096 cat system.raw zeros.raw > big10G.raw
Into
dd if=/dev/zero bs=1024k count=4096 >> system.raw
The absence of an
of=parameter makesdddirect its output toSTDOUT, which>>then appends to your existing file. I've tested it and it works for me, but as always, make sure you have a backup. In particular, typing>instead of>>would wipe your file.
-
-
-
cat system.raw zeros.raw > big10G.raw
shouldn't that be:
cat system.raw zeros.raw >> big10G.raw
Maybe this is why people are having trouble with it?
-
The reason that
cat system.raw zeros.raw > big10G.rawworks is because you're cat'ing the contents of both files before redirecting them tobig10G.rawIn THEORY you should be able to do
cat zeros.raw >> system.rawbut don't quote me on that or blame me if it screws up your image :-)
-
I tried
cat zeros.raw >> system.raw
and it works!
At least for me, it's an old linux ext2 image.
I also tried a gparted twist without the liveCD:
losetup /dev/loop1 system.raw
gparted /dev/loop1
it can see it, but cannot resize it :(
e2label: Bad magic number in superblock ...
-
-
you should really change that
catcommand, this will overwrite the second file. you need to use>>instead of>-
@cat: no, the
catcommand is good in my original article. The use ofcatthere is convoluted, but good. If you're looking for a bettercatcommand, look at those proposed in the comments above.
-
-
-
hello!
Great tutorial, but how i do it in windows?-
Install a qemu guest with linux and do it :P
Serious (or not) do not know!
Great tutorial btw, thanks
-
Hi,
Just to say that I accomplished this on windows by replacing theddandcatsteps - with the windowstypecommand.....I created the raw image:
CMD> qemu-img convert disk.qcow -O raw rawdisk1.rawthen created a copy of that:
CMD> copy rawdisk1.raw rawdisk2.raw
then used that to create a 3rd disk:
CMD> type rawdisk1.raw rawdisk2.raw > rawdisk3.raw
rawdisk3could then boot normally both using qemu (in which case it was in the same condition asrawdisk1) and using the gparted iso - in which case the extra space could be seen.I manipulated the partitions using gparted and grew the disk.
...as they say in Scotland - nae bother!
-
-
Probably the easiest way to grow a raw disk image is:
truncate -size new_image_size disk.raw
where
new_image_sizeis larger than existingdisk.raw.-
@Adam
-sor--sizeaccording to the man page fortruncatetruncate -s +2G BLAHBLAH.imgworked for me up to a point.I still have to figure out how to grow the root partition of my VM
-
I was lucky in that my swap partition was next to my root partition. After increasing raw img size using
truncate, I booted into single user mode, usedfdisk -cu /dev/vdato edit my partition table. Created new swap partition, deleted old swap partition, deleted root partion, made new partion allowing it to take up all the space. Set boot flag. Wrote table to disk. Ranpartx -a /dev/vdato make it active. Then usedresize2fs /dev/vda1to grow the root partition to fill up the space vacated by the old swap partition.-
don't forget to edit the
/etc/fstabentry to pint to the new swap file. You can useblkidto get the UUID or just use/dev/vdaxwherexis the swap partition number.
-
-
-